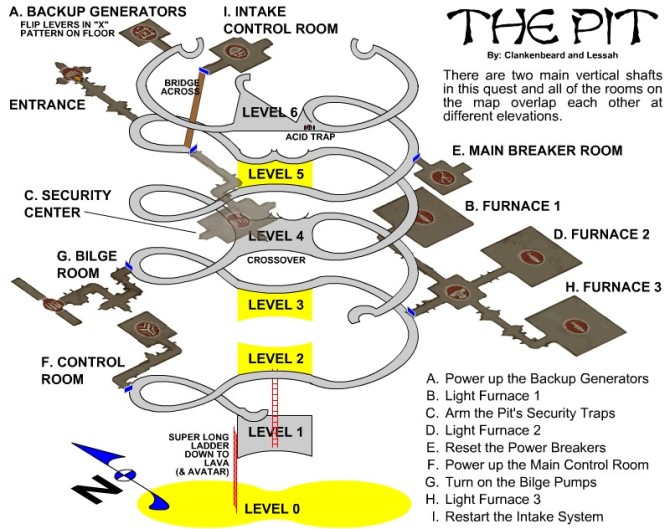
We’ve recently hit level 9 on our whatever life we are currently on. We like level 9 – it has what we call our trio of XP quests:- Gwylan’s Stand, Tear of Dhakaan and (everyone’s favourite) The Pit, all run at elite.
We didn’t used to be fans of this quest. But once I came across the map by Lessah and Clankenbeard I found it much easier to navigate, and it’s been a staple quest ever since. We usually run it first, pop an XP pot before pulling the last valve, then run the 2 other quests. It’s a lot of XP!
But I’ve always thought it would be a lot easier quicker if I just had a set of written instructions saying “Go left”, “Go up” etc. Last night, as we started the quest, Rach reminded me that I keep intending to do this. I tweeted the results and wow, that tweet got a fair few likes. People obviously have issues with the Pit…
I was going to do a version that included the crying and frustration for Bonnie, but I’m rushing this post at lunch. It’s been a very busy few weeks/months 🙂 Instead, for the full impact of how it feels to run this quest, might I suggest you check out Clankenbeards “The Pit & The Pendulum” (this is still one of my favourites).
Anyway – here’s the instructions, tidied up. Disclaimer, these were written while running it last night. I’m 95% sure I’ve got them right 😀
* When I say ‘from the …’ the assumption is you have left that side section and gone back to one of the main shafts
* Level 4 is based on the map above, also know as the cross over level (by us – you can call it what you want, but that’s the bit I’m referring to)
- From the entrance: turn left, go down 1 level (level 4), go across and up, past Main Breaker Room to the acid valve. Turn valve off (if you want), go past it (to the right) then turn go up to Backup Generators
- Toggle levers in a X pattern
- From Main Breaker Room: back down past the acid valve and follow the ramp all the way down (do not cross at level 4) to Furnace
- Light Furnace
- From Furnace: turn right and go up to level 4. Cross over and keep going up to Security Centre.
- Set runes (see ddowiki or my app!)
- From Security Centre: go left and down to level 4, cross over and continue down to Furnace
- Light Furnace 2
- From Furnace: turn right and go up. Continue up to Breaker Room (do not cross over at level 4)
- Set breaker (switches)
- From Breaker Room: turn left and follow ramp down (no cross over) pas furnace to Main Control Room (shrine just past this entrance if you need it)
- Set light puzzles
- From Main Control Room: turn right and follow ramp up to room just after Furnace (Bilge Control Room)
- Pull lever (shrine in hidden room if needed)
- From Bilge Control Room: go left and down to Furnace
- Light Furnace 3
- Turn right and follow ramp up to level 4, cross over and continue up. Cross wooden bridge to end fight.
I hope this is of help to people 🙂
PS this is not the post I had in mind with this tweet
I still need time to work on it
PPS I haven’t done anything with my app in ages! I’m really sorry for the people who are using it but things are crazy busy at the moment. I will be back with it as soon as I can.
Have fun, see you around!

Ah, “The Pit” – one of my favorites. Even thinks we need an epic version, but my fear is that they would just beef-up the mobs, traps, etc. instead of some type of revision. Like maybe house C has been able to do some plant upgrades using different equipment/processes (can keep the same map, though – maybe some of those currently closed-off side areas can be opened up or something…). As far as step 6 goes, yeah your app or the wiki is ‘quick’ BUT there ARE solution placards scattered about the security area, so you don’t really need to use any type of outside resource to solve the runes. Just sayin’…
😉
Are there really? I have never noticed! Damn – I shall look next time 😀
Yep, there really are. They can be a little hard to see if your ‘bloom’ setting is too high – the lights tend to wash them out. But you can temporarily adjust your graphics setting to make them more legible. The hardest one to find is the one that is on the side of the walkway near the wall – you may need to jump to the little ledge on the wall and turn back to see it. But that’s all the hints I’ve giving, here.
🙂
Reblogged this on DDOCentral.
Alright, here we go. I’m giving it the official “Tholgrin’s Run Through.” Have no fear, I shall blow thy Twitter up if I get too lost!
Well, I blew your Twitter up anyway. #PitWatch2K18 !